This lesson uses: Arduino UNO R3 board, TinkerBlock TK01 XL LED module, jumper wires (or breadboard). Write your first program to make TK01 blink; understand setup/loop and digital output. Outcome: external LED on about 1 second, off about 1 second, repeating.
1. Wiring
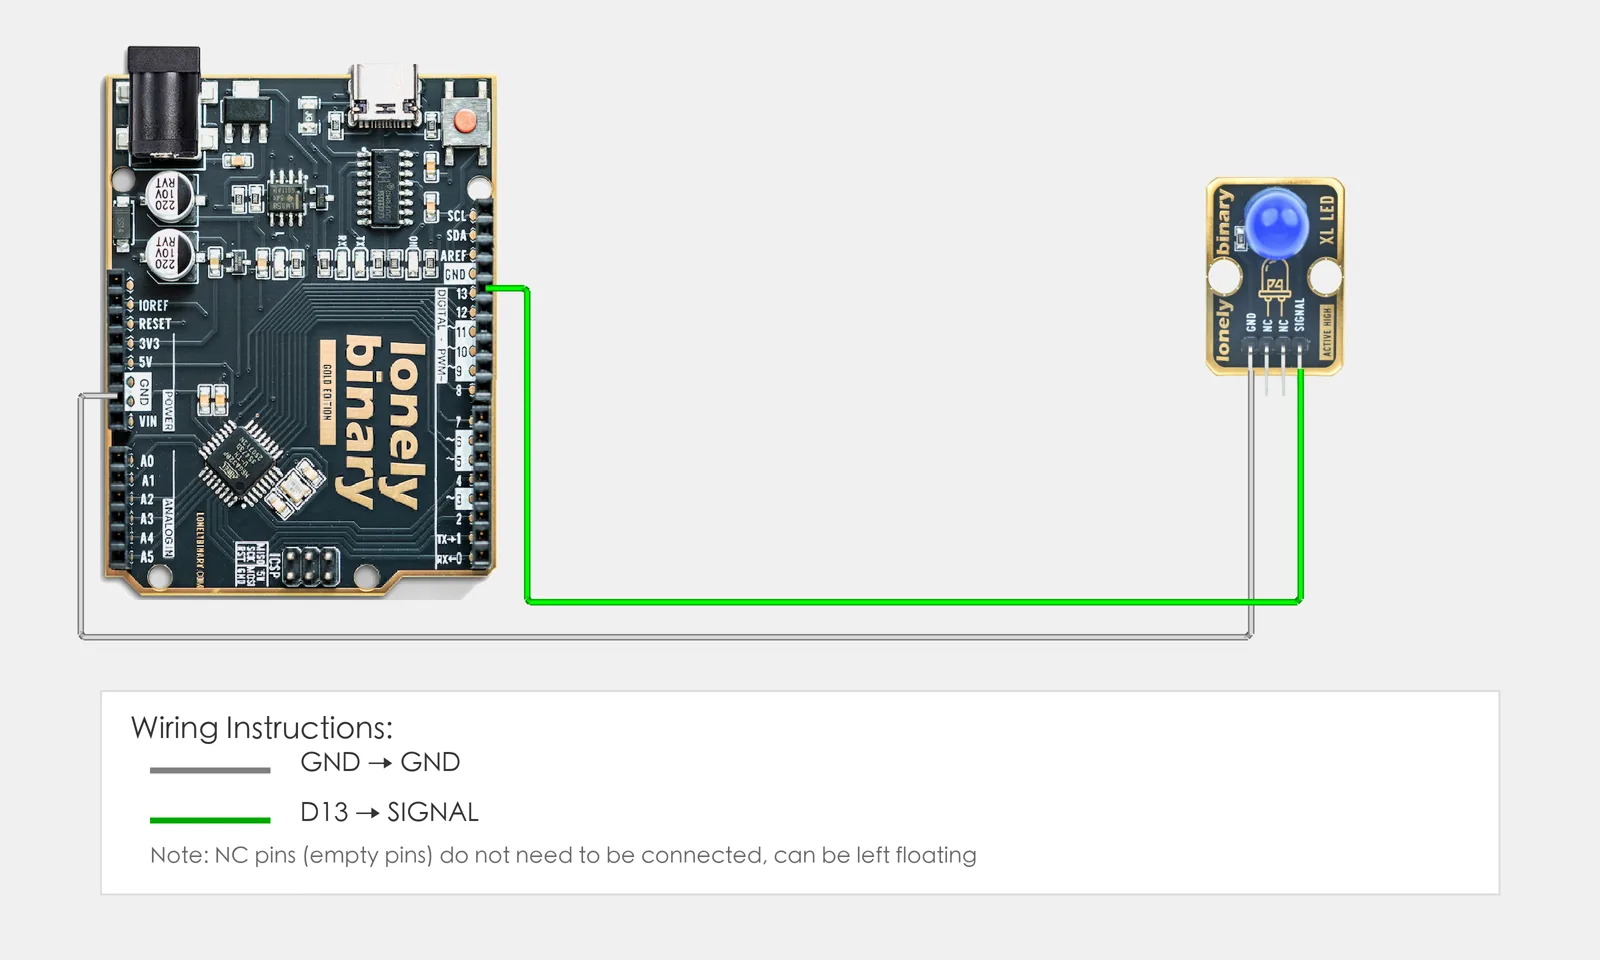
Connect TK01 XL LED to Arduino (SIGNAL to D13, so in code the number 13 means “the pin connected to the LED”):
- GND → Arduino GND
- SIGNAL → Arduino D13
- NC — leave unconnected
2. New sketch
- Arduino IDE: File → New (or Ctrl/Cmd + N) to create a blank sketch
- Confirm board and port are selected (same as Lesson 01)
- Type the code below into the default
setup()andloop()yourself
3. Program structure
An Arduino sketch has two fixed blocks: setup() and loop().
setup(): The code inside runs once when the board powers up. Here we put “tell the board: pin 13 is used to control the LED.”loop(): The code inside runs over and over. Here we put “LED on → wait 1 s → LED off → wait 1 s,” so the LED keeps blinking.
Type the following; after upload you will see the LED blink.
void setup() {
  // runs once
}

void loop() {
  // repeats forever
}
4. Code to write
Type the code below line by line into setup() and loop() (do not copy-paste; typing it yourself helps you remember):
// First program: LED on D13 on 1 s, off 1 s, repeat
void setup() {
  pinMode(13, OUTPUT);   // set pin 13 as output so digitalWrite can control the LED
}

void loop() {
  digitalWrite(13, HIGH);   // pin 13 high, TK01 LED on
  delay(1000);              // hold 1000 ms (1 s)
  digitalWrite(13, LOW);    // pin 13 low, LED off
  delay(1000);              // wait 1 s then back to start of loop, so it repeats
}
Program notes
Overall idea: setup() runs once and sets pin 13 as output; loop() keeps repeating “on → wait 1 s → off → wait 1 s,” so the LED blinks. pinMode, digitalWrite, and delay are functions provided by Arduino; their arguments (pin number, OUTPUT, HIGH/LOW, milliseconds) control the board.
Why pinMode before digitalWrite: The pin may default to input or alternate function; set it to OUTPUT so it can drive the LED with a stable high/low level.
| Code | In this lesson |
|---|---|
pinMode(13, OUTPUT) | Set pin 13 to output mode so digitalWrite can control the level |
digitalWrite(13, HIGH) | Pin 13 outputs high (about 5V), TK01 on; HIGH means “on” |
digitalWrite(13, LOW) | Pin 13 outputs low (about 0V), LED off; LOW means “off” |
delay(1000) | Program pauses 1000 ms (1 s) before the next line; controls on/off duration |
5. Hands-on
- After entering the code, click Verify (✓) to compile
- Click Upload (→) to upload to the board
- Watch TK01 XL LED: it should be on about 1 s, off about 1 s
- Change
delay(1000)todelay(200)and upload again; observe the blink get faster
Expected result:
Proceed to Lesson 03.
6. Common issues
| Symptom | What to do |
|---|---|
| LED does not blink after upload | Check wiring GND, SIGNAL→D13; confirm board and port; on some boards the LED is active-low—try swapping HIGH and LOW |
| Compile error | Check that brackets and semicolons are paired and keywords are spelled correctly |
Edit this page — content/guides/tinkerblock-workshop/02-first-program-blink.mdx
Questions about this product
See what other owners have asked, and read their solutions.
XL LED
Loading discussions…
Discuss this article
Ask about this page. The answer stays here, on the page it belongs to, for whoever hits the same wall next.