This lesson uses: Arduino UNO R3 board, TinkerBlock TK04 Push Button module, TinkerBlock TK01 XL LED module, jumper wires (or breadboard). Learn to use the serial monitor and Serial to print. Outcome: open the serial monitor (9600 baud) to see “Program started” and button state (pressed/released); the button still controls the LED, which helps debugging.
1. What is serial communication?
Serial communication is one way the Arduino and the computer exchange information. Like two people on a call:
- The Arduino “talks” over the USB cable (sends data)
- The computer “listens” with the serial monitor (receives and displays data)
Why use serial?
- While the program runs we cannot see what is happening inside the Arduino
- Serial lets us “see” what the program is doing, which helps debugging (finding problems)
- We can show sensor readings, program state, and so on
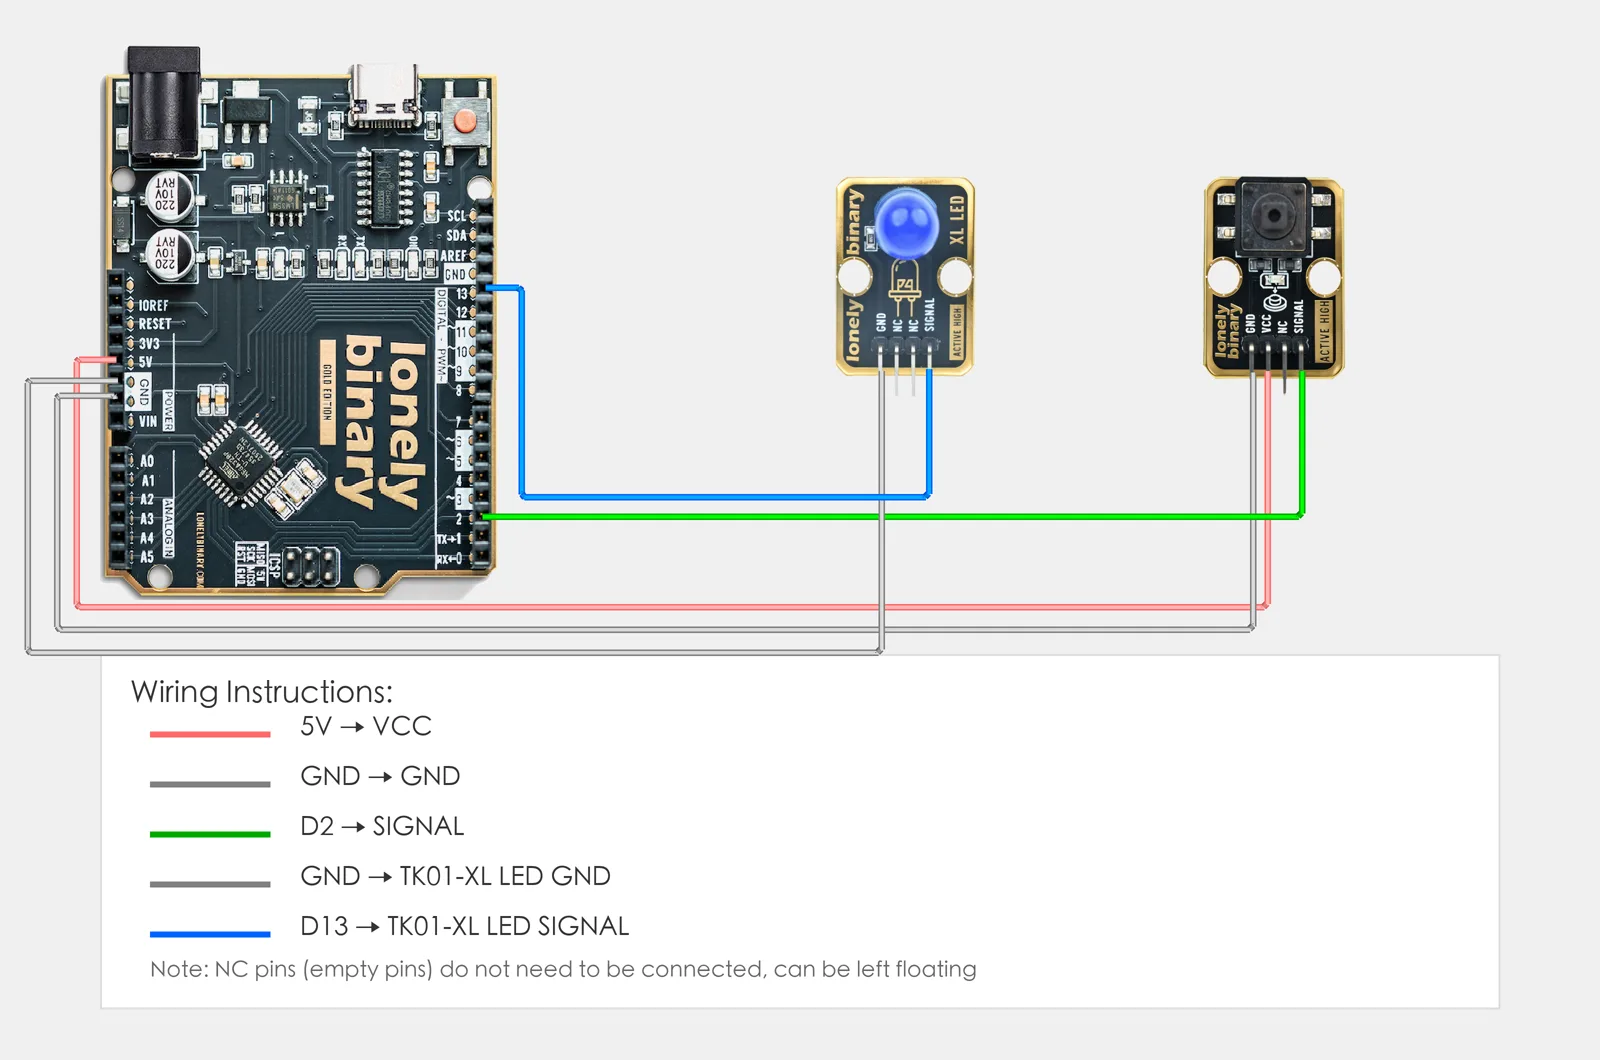
2. Wiring
Same as Lesson 03:
- TK04 button: VCC → 5V, GND → GND, SIGNAL → D2, NC leave unconnected
- TK01 LED: GND → GND, SIGNAL → D13
3. New sketch
- Arduino IDE: File → New (or Ctrl/Cmd + N) to create a blank sketch
- Confirm board and port are selected (same as Lesson 01)
- Type the code below into the default
setup()andloop()yourself
4. Program structure
Same as last lesson: two fixed blocks setup() and loop().
setup():- Tell the board “pin 2 for button, pin 13 for LED”
- Start serial (so the Arduino can talk to the computer)
- Print one startup message
- Runs once
loop(): Keep repeating “read button → print button state to serial → control LED from button → short delay”.
Open the serial monitor (choose 9600 baud), type the code, upload, and you will see on the computer whether the button is pressed or released; the LED will follow.
5. Code to write
Type the code below line by line into setup() and loop() (do not copy-paste; typing it yourself helps you remember):
// Serial debug: read button and print state to serial, and control LED; baud 9600
#define BUTTON_PIN 2   // button to D2
#define LED_PIN 13     // LED to D13

void setup() {
  pinMode(BUTTON_PIN, INPUT);   // D2 read button
  pinMode(LED_PIN, OUTPUT);     // D13 control LED
  Serial.begin(9600);           // serial baud 9600, must match monitor
  Serial.println("Program started");  // printed once after power-up
}

void loop() {
  int state = digitalRead(BUTTON_PIN);

  Serial.print("Button: ");   // print prefix first, no newline
  if (state == HIGH) {
    Serial.println("pressed");   // then print state and newline
    digitalWrite(LED_PIN, HIGH);
  } else {
    Serial.println("released");
    digitalWrite(LED_PIN, LOW);
  }
  delay(200);   // lower refresh rate so you can read it
}
Program notes
Overall idea: In setup() use Serial.begin(9600) to start serial; then in loop() each time read the button and print “Button: pressed/released”, and control the LED from that state. On the computer, open the serial monitor at 9600 baud to see the text and check that the program behaves as expected.
print vs println: Serial.print() only sends the content, no newline, so the next output continues on the same line; Serial.println() sends and then adds a newline, so each message can be one line. Baud rate must match the monitor or you get garbage.
| Code | In this lesson |
|---|---|
Serial.begin(9600) | In setup, init serial at 9600 baud; call once; then you can use print/println; monitor must also be 9600 |
Serial.print("Button: ") | Send the string to serial without newline; next output continues after it |
Serial.println("pressed") | Send the string to serial with newline; one message per line |
Serial.println(state) | Can print variables or numbers; use when debugging to see values |
Difference between print and println:
Serial.print(): After printing, no newline; next print continues on the same line.Serial.println(): After printing, newline; next print starts on a new line.
Example:
Serial.print("Button: ");   // print "Button: ", no newline
Serial.println("pressed");  // print "pressed", then newline
Serial monitor shows:
Button: pressed
What you can print:
- Text:
Serial.print("Temperature: "); - Numbers:
Serial.print(123); - Variables:
Serial.print(state);(prints the variable’s value)
7. Hands-on
7.1 Basic steps
- After entering the code, click Verify (✓) to compile
- Click Upload (→) to upload to the board; make sure the board is connected and upload succeeds
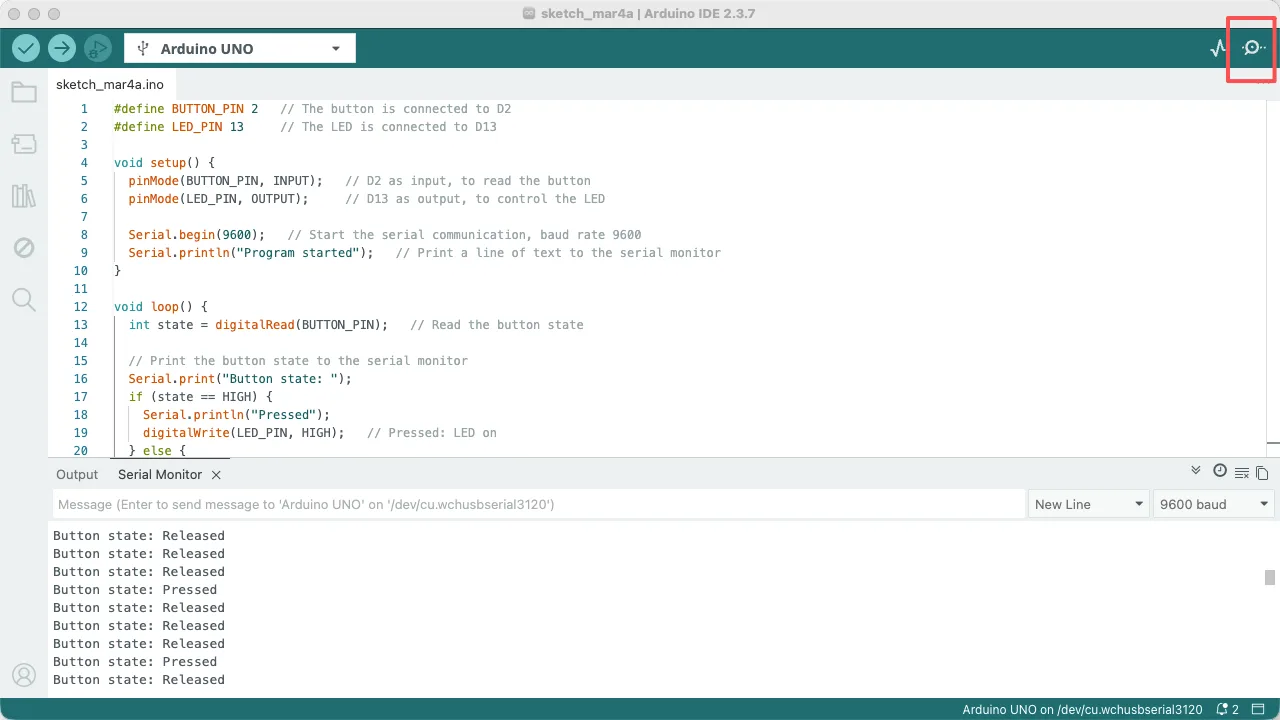
- Open the serial monitor: Click the serial monitor icon in the red box at the top right of the Arduino IDE (or menu Tools → Serial Monitor, shortcut Ctrl/Cmd + Shift + M) to open the serial window; the program output will appear there as in the figure.
- Important: Set baud at the bottom right of the window to 9600 (must match
Serial.begin(9600)in the code)
- Important: Set baud at the bottom right of the window to 9600 (must match
 4. Watch the serial monitor:
- You should see “Program started” once (printed in
setup()) - Then it keeps printing “Button: pressed” or “Button: released” (printed in
loop())
- Test the button:
Expected result: As in the figure above.
7.2 Debug tips
Tip 1: Use serial to see where the program has reached
void loop() {
  Serial.println("Start reading button");   // marker: we reached here
  int state = digitalRead(BUTTON_PIN);
  Serial.println("Read done");             // marker: read finished
  // ...
}
Tip 2: Print the variable’s value to check it
int state = digitalRead(BUTTON_PIN);
Serial.print("Button raw value: ");
Serial.println(state);   // print 0 or 1 to see if read is correct
Tip 3: Use different labels for different states
if (state == HIGH) {
  Serial.println("[pressed] LED on");
} else {
  Serial.println("[released] LED off");
}
7.3 Try it yourself
-
Change baud rate:
- Change
Serial.begin(9600)toSerial.begin(115200) - After upload, set the serial monitor to 115200 as well
- Observe: mismatched baud gives garbage
- Change
-
Combine print and println:
- Try combining
Serial.print()andSerial.println() - Example:
Serial.print("Value: "); Serial.println(state);
- Try combining
-
Print numbers:
- Try
Serial.println(123);to print a number - Try
Serial.println(state);to print the variable’s value
- Try
Proceed to Lesson 06.
8. Common issues
| Symptom | Cause | What to do |
|---|---|---|
| Nothing in serial monitor | Serial not started or baud mismatch | Make sure Serial.begin(9600) is in setup(); set monitor baud to 9600; confirm port (Tools → Port) |
| Garbage in serial monitor | Baud mismatch | Set serial monitor baud to 9600 (same as Serial.begin(9600) in code); if you change baud in code, change it in the monitor too |
| “Program started” only once | Normal | “Program started” runs once in setup(); the rest in loop() repeats |
| Print too fast to read | delay too small | Increase delay(), e.g. to delay(500), so lines don’t scroll too fast |
| LED does not follow button | Wiring | Check TK04 VCC→5V, GND→GND, SIGNAL→D2; check TK01 SIGNAL→D13, GND→GND |
9. Summary
In this lesson you learned:
- Serial communication: How the Arduino and computer exchange information
Serial.begin(9600): Start serial; baud must match the serial monitorSerial.print(): Print text/numbers without newlineSerial.println(): Print text/numbers with newline- Debug tips: Use serial to see program state and find problems
Reminders:
- Serial monitor baud must match
Serial.begin()in the code Serial.begin()must be called once insetup()- The serial monitor can show text, numbers, and variable values; it’s a good tool for debugging
Edit this page — content/guides/tinkerblock-workshop/05-serial-monitor-debugging.mdx
Questions about this product
See what other owners have asked, and read their solutions.
This page covers several products. Choose yours to see the right discussions.
Discuss this article
Ask about this page. The answer stays here, on the page it belongs to, for whoever hits the same wall next.