This lesson uses: Arduino UNO R3 board, TinkerBlock TK01 XL LED module, jumper wires (or breadboard). Learn PWM and analogWrite(); use a for loop for outcome: LED fades from dim to bright and back to dim—a breathing light.
1. Wiring
Connect TK01 XL LED to Arduino (must use a PWM pin, e.g. D3, D5, D6, D9, D10, D11):
- GND → Arduino GND
- SIGNAL → Arduino D3 (PWM pin)
- NC leave unconnected
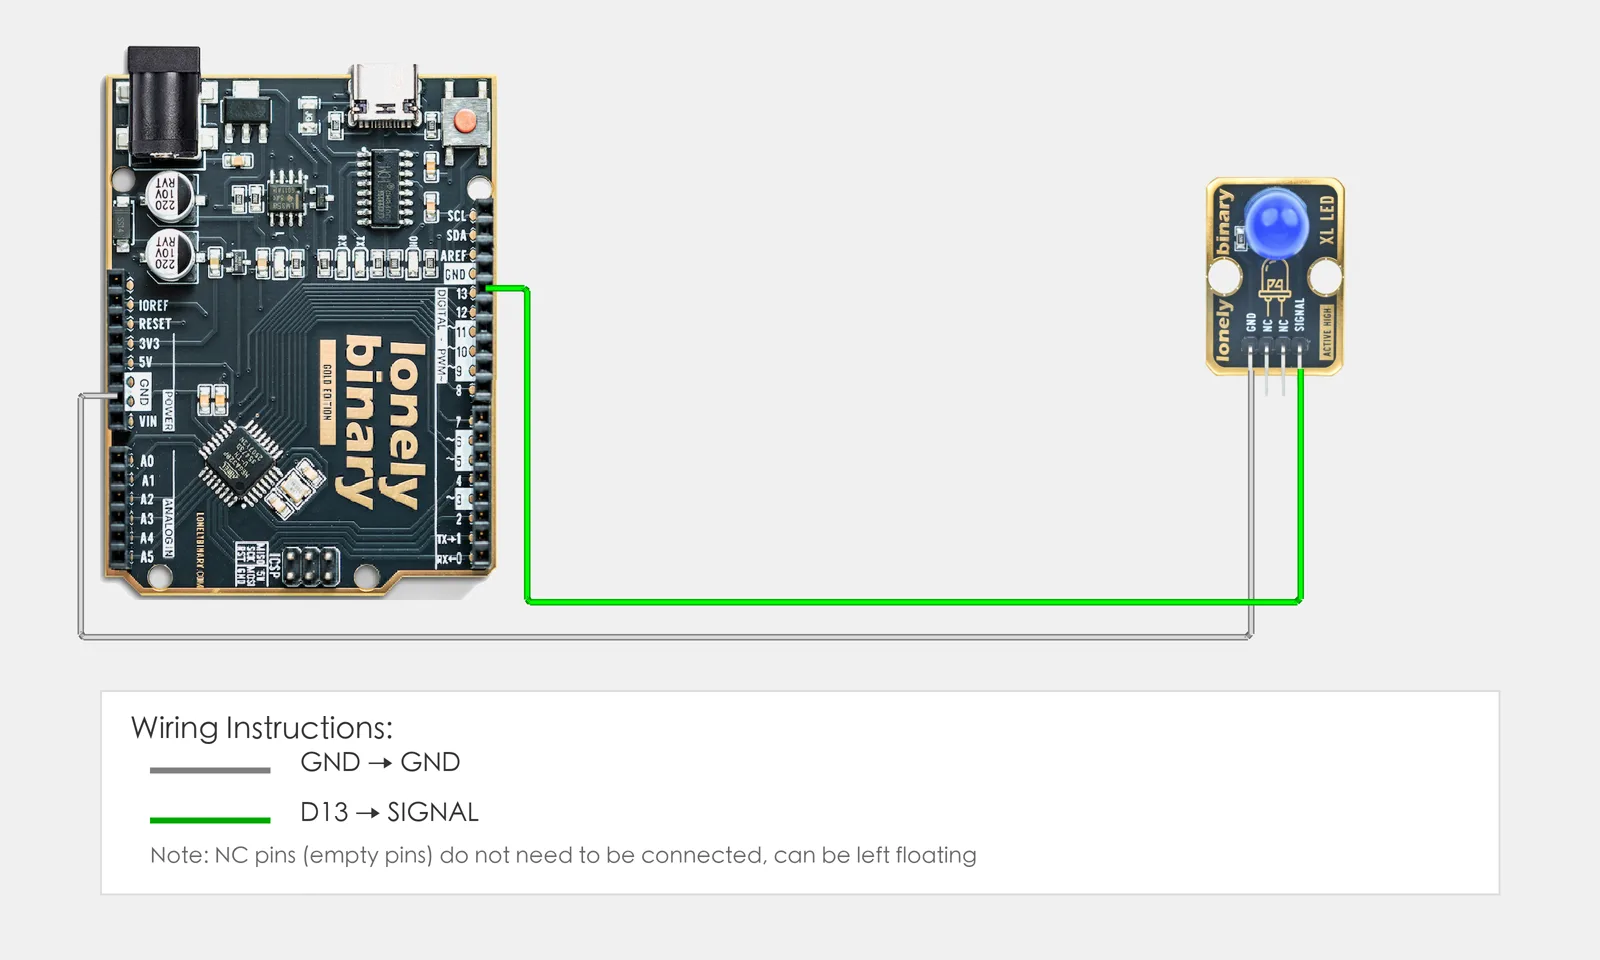
Note: analogWrite() only works on PWM pins (Arduino Uno: D3, D5, D6, D9, D10, D11, marked with ~).
2. What is PWM?
PWM (Pulse Width Modulation) is a way to “simulate” different brightness or voltage with a digital pin.
- Principle: The pin switches quickly between high (on) and low (off). The ratio of high time to the total period is the duty cycle: higher duty cycle → higher average voltage → LED looks brighter; lower → dimmer.
- On Arduino: In
analogWrite(pin, value), value is 0–255, corresponding to 0%–100% duty cycle. You don’t compute the waveform; write 0 (off), 255 (full), or something in between (e.g. 128 ≈ half), and the board outputs the right duty cycle. - Why it “fades”: Step through 0–255 in small steps; each step
analogWritea slightly larger (or smaller) value and wait a few ms—to the eye it looks like smooth brightness change, a breathing light.
With PWM in mind, wire up and type the code so the LED really “breathes.”
3. New sketch
- Arduino IDE: File → New (or Ctrl/Cmd + N) to create a blank sketch
- Confirm board and port are selected (same as Lesson 01)
- Type the code below into the default
setup()andloop()yourself
4. Program structure
Same as last lesson: two fixed blocks setup() and loop().
setup(): Tell the board “pin 3 for LED (PWM output)”; runs once.loop(): Keep repeating “forloop dim→bright →forloop bright→dim”.
Type the code below and the LED will slowly brighten then dim, like breathing.
5. Code to write
Type the code below line by line into setup() and loop() (do not copy-paste; typing it yourself helps you remember):
#define LED_PIN 3   // LED on D3 (PWM pin)

void setup() {
  pinMode(LED_PIN, OUTPUT);   // D3 output for LED
}

void loop() {
  // Dim to bright (0 → 255)
  for (int brightness = 0; brightness <= 255; brightness++) {
    analogWrite(LED_PIN, brightness);   // Set brightness (0=dim, 255=bright)
    delay(10);   // 10 ms for smoother fade
  }

  // Bright to dim (255 → 0)
  for (int brightness = 255; brightness >= 0; brightness--) {
    analogWrite(LED_PIN, brightness);   // Output current brightness
    delay(10);   // 10 ms per step for smoother fade
  }
}
Program notes
Overall idea: Two for loops: brightness 0→255 then 255→0; each step analogWrite and delay(10) for a smooth fade. PWM pin 0–255 is duty cycle; visually that’s brightness change.
About the for loop
- Three parts in parentheses: In
for, two semicolons separate: init (e.g.int brightness = 0), condition (e.g.brightness <= 255), update (e.g.brightness++). Init runs once; then each iteration: check condition → if true run body → run update → check again, until condition is false. brightness++: “Add 1 to brightness”, same asbrightness = brightness + 1.brightness--: “Subtract 1 from brightness”, same asbrightness = brightness - 1.
| Code | In this lesson |
|---|---|
analogWrite(LED_PIN, brightness) | PWM control LED brightness 0–255 (0=off/dim, 255=full). Only on PWM pins (D3, D5, D6, D9, D10, D11) |
for (int brightness = 0; brightness <= 255; brightness++) | for loop: variable brightness from 0, add 1 each time until 255. brightness++ is brightness = brightness + 1 |
for (int brightness = 255; brightness >= 0; brightness--) | for loop: from 255 down to 0. brightness-- is brightness = brightness - 1 |
6. Hands-on
- After entering the code, click Verify (✓) to compile
- Click Upload (→) to upload to the board
- Watch TK01 XL LED: it should gradually brighten then dim—breathing light
- Try yourself:
- Change
delay(10)todelay(5)ordelay(20)and see speed change - Change
brightness++tobrightness = brightness + 5for a faster fade
- Change
Expected result: As in the figure.
Proceed to Lesson 17.
7. Common issues
| Symptom | What to do |
|---|---|
| LED only on/off, no fade | Ensure SIGNAL is on a PWM pin (D3, D5, D6, D9, D10, D11), not a plain digital pin |
| Fade too fast or too slow | Change delay(): larger value → slower fade |
| Compile error | Check for parentheses and semicolons: for (int i = 0; i <= 255; i++) |
Edit this page — content/guides/tinkerblock-workshop/16-pwm-fading-led.mdx
Questions about this product
See what other owners have asked, and read their solutions.
XL LED
Loading discussions…
Discuss this article
Ask about this page. The answer stays here, on the page it belongs to, for whoever hits the same wall next.