This lesson uses: Arduino UNO R3 board, TinkerBlock TK51 TM1637 4-Digit Display module, jumper wires (or breadboard). Learn library install and use; control the 4-digit display with TM1637Display library; outcome: display counts up from 0 to 9999, changing every 0.5 s, then repeats.
1. Install the library
Before writing code, install the TM1637Display library:
- Arduino IDE: Tools → Manage Libraries...
- Search: TM1637Display
- Find TM1637Display by Avishay Orpaz, click Install
- Wait until installation finishes
2. Wiring
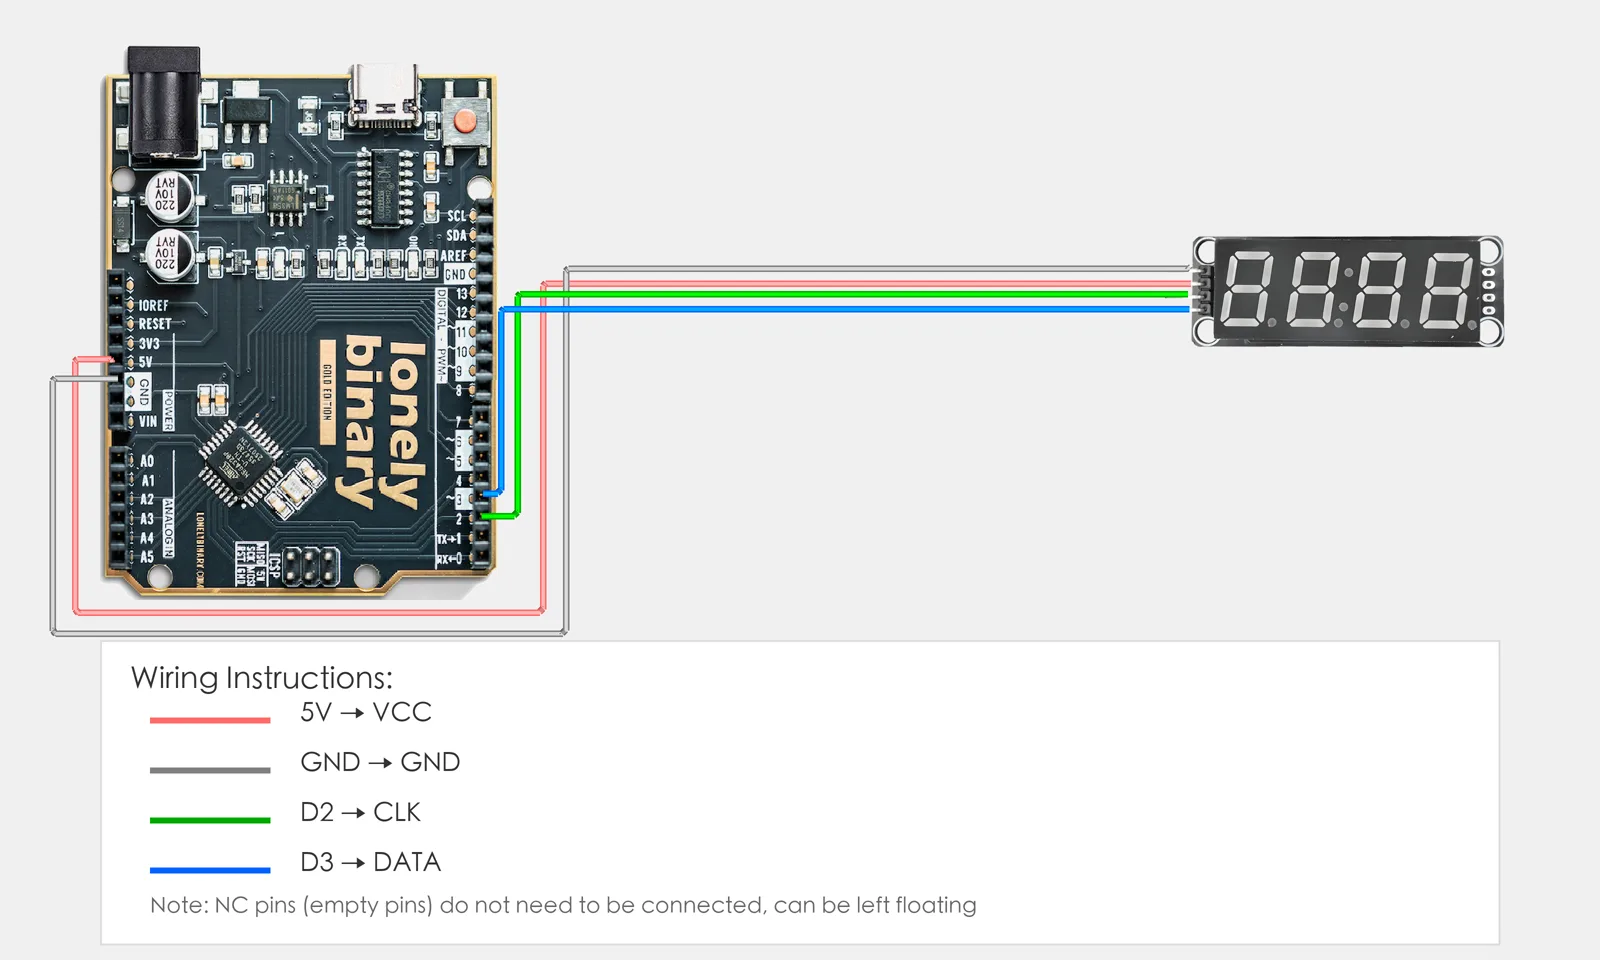
Connect TK51 TM1637 4-digit display to Arduino:
- GND → Arduino GND
- VCC → Arduino 5V
- CLK → Arduino D2
- DIO → Arduino D3
- NC leave unconnected
3. New sketch
- Arduino IDE: File → New (or Ctrl/Cmd + N) to create a blank sketch
- Confirm board and port are selected (same as Lesson 01)
- Type the code below into the file top and into
setup()andloop()yourself
4. Program structure
Same as last lesson: two fixed blocks setup() and loop().
setup(): Include library, create display object, set brightness; runs once.loop(): Keep repeating “show number → wait → show next number → repeat”.
After uploading the display will count from 0 to 9999; two wires drive four digits.
5. Code to write
Type the code below at the top of the file and in setup() and loop() (do not copy-paste; typing it yourself helps you remember):
#include <TM1637Display.h>   // Include library

#define CLK_PIN 2   // CLK on D2
#define DIO_PIN 3   // DIO on D3

// Create display object
TM1637Display display(CLK_PIN, DIO_PIN);

void setup() {
  display.setBrightness(7);   // Brightness 0-7, 7 = brightest
  Serial.begin(9600);
  Serial.println("4-digit display program started");
}

void loop() {
  // Show 0-9999 in a loop
  for (int i = 0; i < 10000; i++) {
    display.showNumberDec(i);   // Show number i
    Serial.print("Display: ");
    Serial.println(i);
    delay(500);
  }
}
Program notes
Overall idea: TM1637 talks to Arduino on two lines (CLK, DIO); the library handles the protocol. After creating the display object, setBrightness(0–7) sets brightness and showNumberDec(i) shows decimal i. A for loop from 0 to 9999 gives the counting effect.
| Code | In this lesson |
|---|---|
#include <TM1637Display.h> | Include library; provides TM1637Display class and methods |
TM1637Display display(CLK_PIN, DIO_PIN) | Construct display object with CLK and DIO pins |
display.setBrightness(7) | Brightness 0–7, 7 = brightest |
display.showNumberDec(i) | Show integer i (0–9999) on 4-digit display |
6. Hands-on
- After entering the code, click Verify (✓) to compile
- Click Upload (→) to upload to the board
- Watch TK51: it should show 0, 1, 2, 3... up to 9999, then repeat
- Try yourself:
- Use
display.showNumberDec(i, true)to show leading zeros - Show a fixed number, e.g.
display.showNumberDec(1234)
- Use
Expected result: As in the figure.
Proceed to Lesson 22.
7. Common issues
| Symptom | What to do |
|---|---|
| Compile error: library not found | Install TM1637Display (Tools → Manage Libraries) |
| Display wrong | Check CLK and DIO wiring; VCC→5V, GND→GND |
Edit this page — content/guides/tinkerblock-workshop/21-tm1637-4-digit-display.mdx
Questions about this product
See what other owners have asked, and read their solutions.
TM1637 4-Digit Display
Loading discussions…
Discuss this article
Ask about this page. The answer stays here, on the page it belongs to, for whoever hits the same wall next.