This lesson uses: Arduino UNO R3 board, TinkerBlock TK05 Latching Button module, TinkerBlock TK01 XL LED module, jumper wires (or breadboard). Learn the latching button and state hold. Outcome: press once and the LED stays on; press again and it turns off; no need to hold the button.
1. Wiring
- TK05 latching button: VCC → 5V, GND → GND, SIGNAL → D2, NC leave unconnected
- TK01 LED: GND → GND, SIGNAL → D13
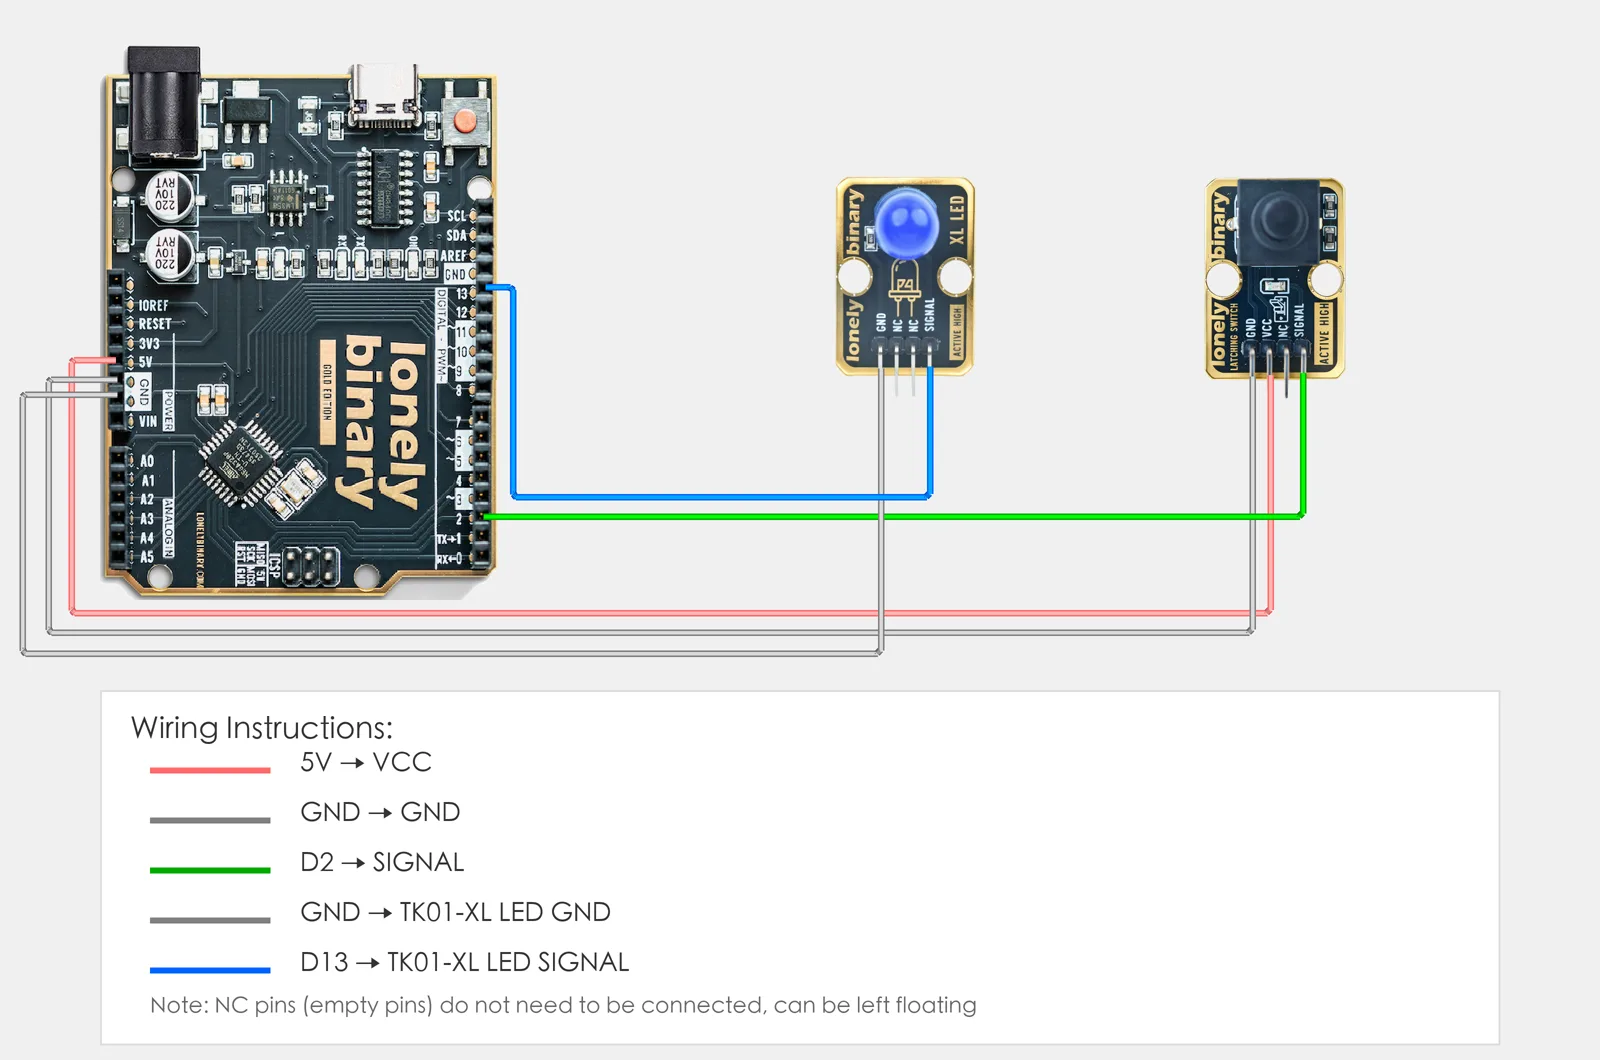
2. New sketch
- Arduino IDE: File → New (or Ctrl/Cmd + N) to create a blank sketch
- Confirm board and port are selected (same as Lesson 01)
- Type the code below into the default
setup()andloop()yourself
3. Program structure
Same as last lesson: two fixed blocks setup() and loop().
setup(): Tell the board “pin 2 for reading the latching button, pin 13 for the LED”; runs once.loop(): Keep repeating “read pin 2 → if latched then LED on, else LED off → short delay”.
After you type the code in, one press makes the LED stay on, another press turns it off; you don’t need to hold the button.
4. Code to write
Type the code below line by line into setup() and loop() (do not copy-paste; typing it yourself helps you remember):
// Latching button on D2, LED on D13: latched=HIGH LED on, unlatched=LOW LED off
#define BUTTON_PIN 2
#define LED_PIN 13

void setup() {
  pinMode(BUTTON_PIN, INPUT);   // D2 input, read latching button
  pinMode(LED_PIN, OUTPUT);     // D13 output, control LED
}

void loop() {
  int state = digitalRead(BUTTON_PIN);   // TK05 is HIGH when latched, LOW when unlatched

  if (state == HIGH) {
    digitalWrite(LED_PIN, HIGH);   // latched: LED on
  } else {
    digitalWrite(LED_PIN, LOW);    // unlatched: LED off
  }
  delay(100);   // short delay to reduce bounce
}
Program notes
Overall idea: The latching button is read with digitalRead like a normal button; the difference is that TK05 keeps its output (latched HIGH or unlatched LOW) after one press until you press again. So the program still does “HIGH = LED on, LOW = LED off” and doesn’t need to remember “last state” in code.
| Code | In this lesson |
|---|---|
digitalRead(BUTTON_PIN) | Read current state of latching button: latched=HIGH, unlatched=LOW |
if (state == HIGH) | If latched turn LED on, else off; hardware holds the state, program just follows |
delay(100) | Lower read rate to reduce bounce |
5. Hands-on
- After entering the code, click Verify (✓) to compile
- Click Upload (→) to upload to the board
- Latching button controls LED:
- Press TK05 once: LED stays on (latched)
- Press again: LED turns off (unlatched)
- Press again: LED stays on again (latched)
- Compare with Lesson 03’s normal button: the normal button must be held for the LED to stay on; the latching button keeps state with one press
Expected result:
Proceed to Lesson 08.
6. Common issues
| Symptom | What to do |
|---|---|
| LED does not follow latch/unlatch | Check TK05 wiring VCC→5V, GND→GND, SIGNAL→D2; check TK01 SIGNAL→D13, GND→GND |
| No response to press | TK05 is a latching button; press until you hear a “click” to latch; press again and hear “click” to unlatch |
Edit this page — content/guides/tinkerblock-workshop/07-latching-button.mdx
Questions about this product
See what other owners have asked, and read their solutions.
This page covers several products. Choose yours to see the right discussions.
Discuss this article
Ask about this page. The answer stays here, on the page it belongs to, for whoever hits the same wall next.