This lesson uses: Two Arduino UNO R3 boards, TinkerBlock TK15 IR Receiver module, TinkerBlock TK16 IR Remote Sender module, jumper wires (or breadboard). Learn infrared communication (one board receives, one sends); outcome: sender sends IR codes on a timer, receiver prints received codes on serial; you can also point a normal remote at the receiver and see the key codes.
1. Install the library
Before writing code, install the IRremote library:
- Arduino IDE: Tools → Manage Libraries...
- Search: IRremote
- Find IRremote by shirriff, z3t0, ArminJo, click Install
- Wait until installation finishes
2. Wiring (two boards)
This lesson uses two UNO R3 boards: one with the receiver only, one with the sender only.
Board A: IR receiver (TK15)
- GND → Arduino GND
- VCC → Arduino 5V
- SIGNAL → Arduino D3
- NC leave unconnected
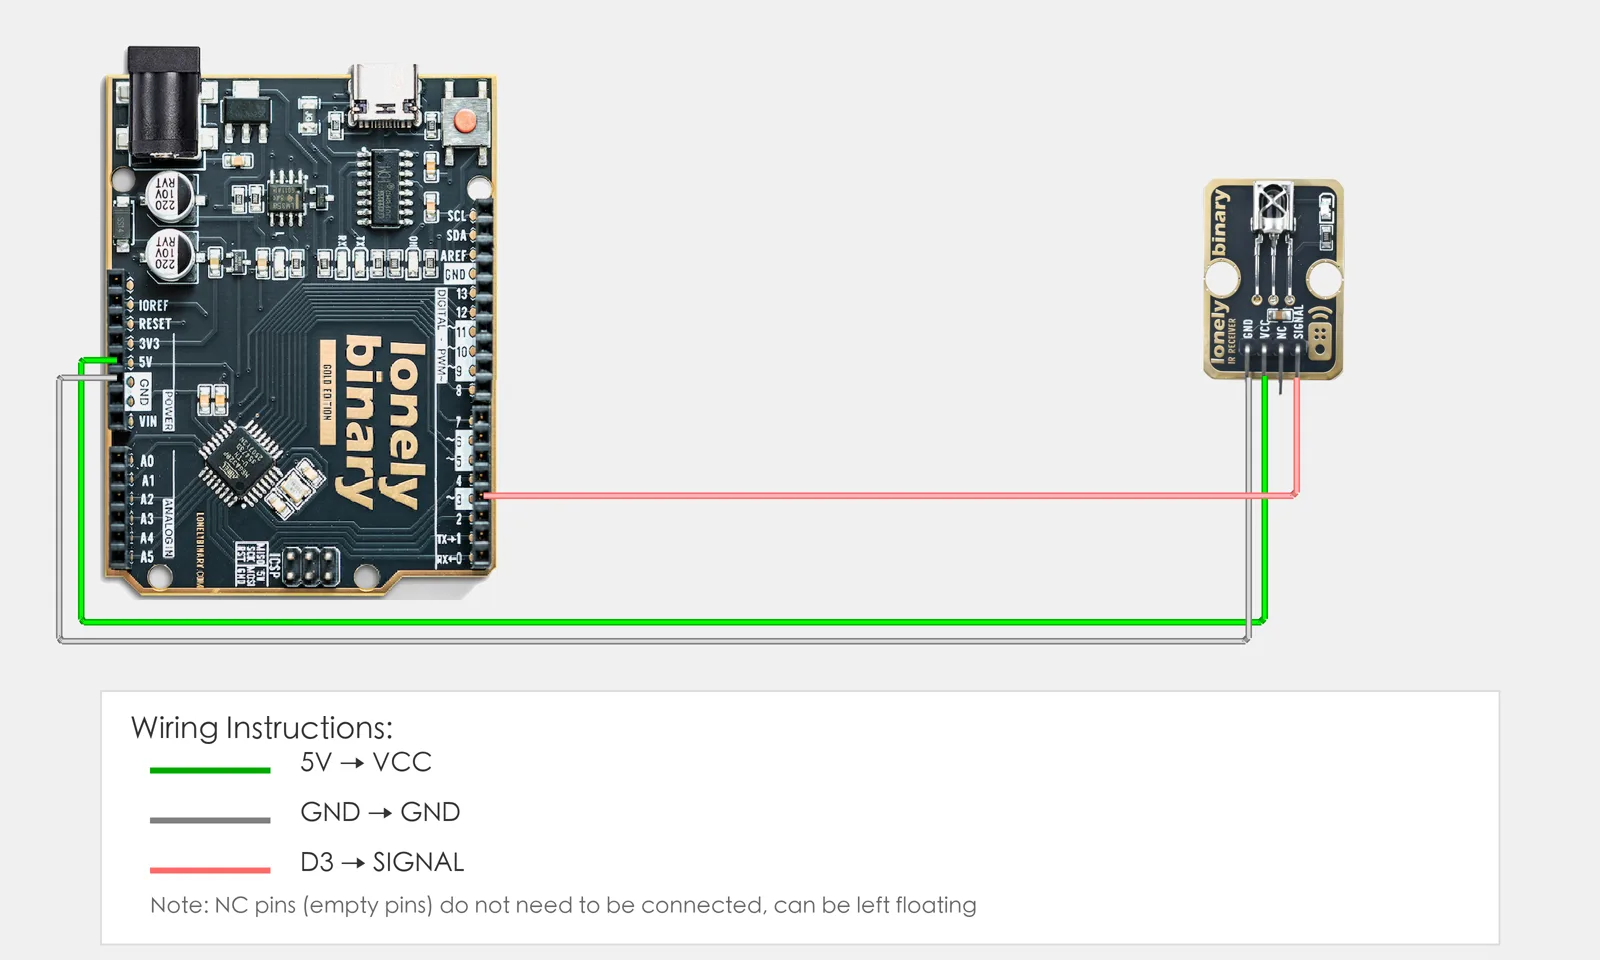
Board B: IR sender (TK16)
- GND → Arduino GND
- VCC → Arduino 5V
- SIGNAL → Arduino D3
- NC leave unconnected
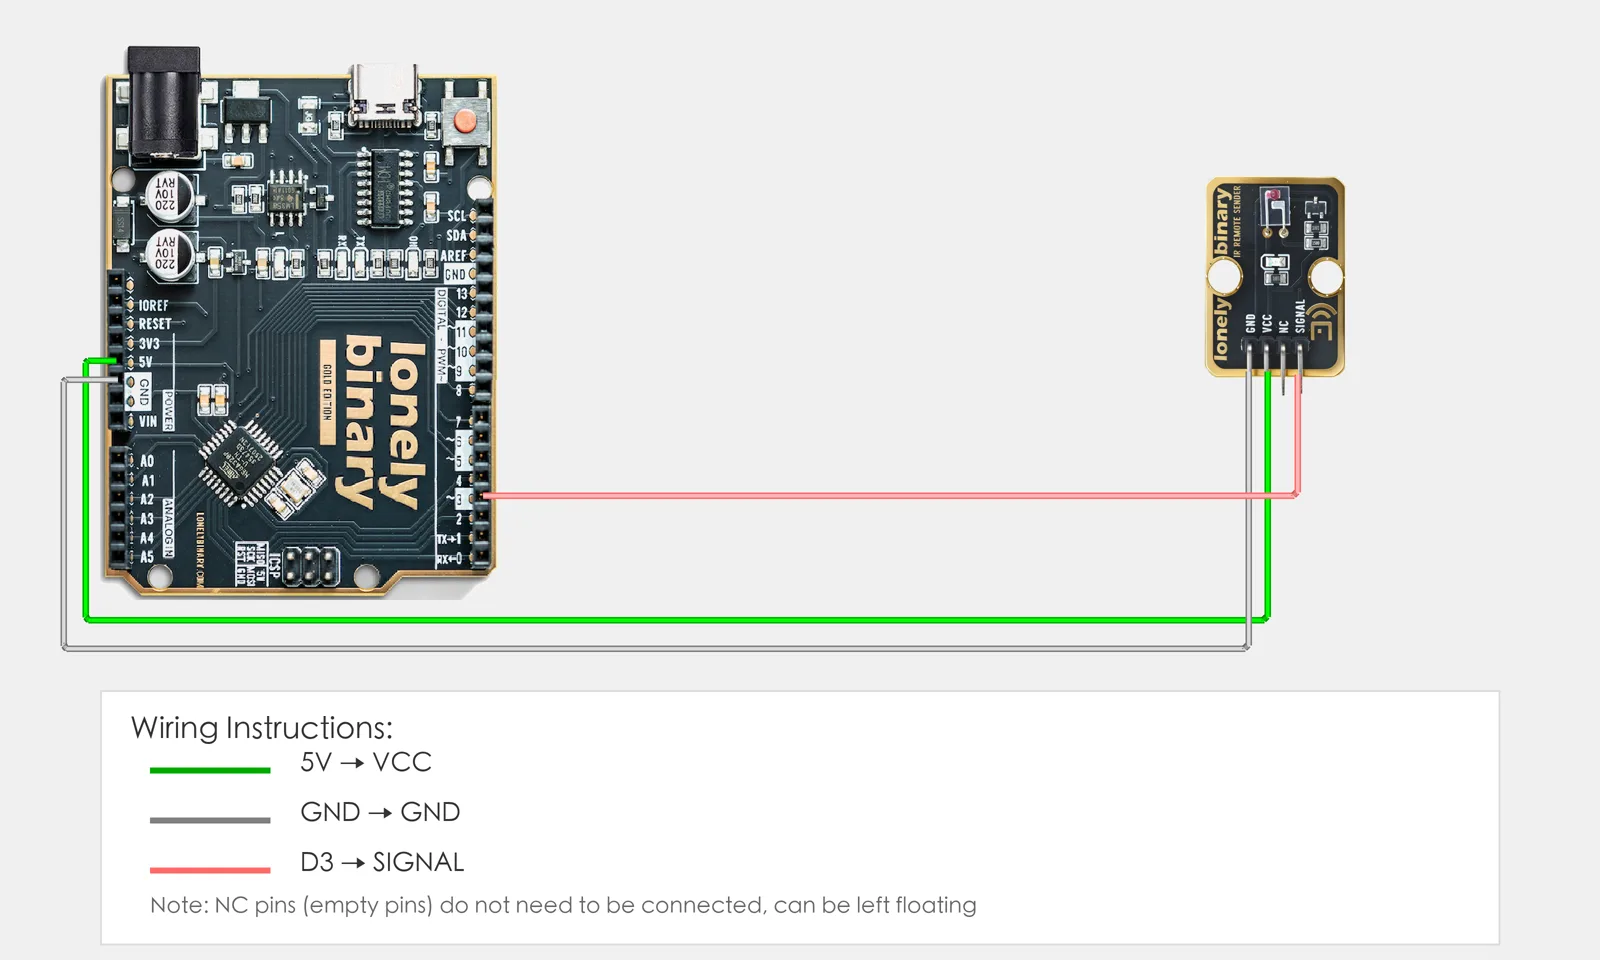
3. New sketch and program structure
You need two programs, one for each board:
- Program 1 (receiver): Upload to board A (with TK15); receives IR and prints to serial.
- Program 2 (sender): Upload to board B (with TK16); sends IR at intervals.
Each is a separate sketch: File → New, set board and port, then type the code into setup() and loop().
One program per board—one receives, one sends; point the sender at the receiver and you’ll see codes on serial.
4. Program 1: Receiver (upload to board A)
In the sketch for board A, type the code below and upload to the UNO with TK15. It needs IRremote version 4 or later, which is what the Library Manager installs today.
// Program 1: IR receiver (upload to board A with TK15 on D3)
#include <IRremote.hpp>

#define IR_RX_PIN 3   // TK15 SIGNAL on D3

void setup() {
  Serial.begin(9600);
  IrReceiver.begin(IR_RX_PIN, DISABLE_LED_FEEDBACK);  // Start receiving
  Serial.println("IR receiver ready");
}

void loop() {
  if (IrReceiver.decode()) {                // A whole frame has arrived
    IRData &d = IrReceiver.decodedIRData;
    if (d.flags & IRDATA_FLAGS_IS_REPEAT) {
      Serial.println("[repeat]");           // A held button, no new data
    } else {
      Serial.print(getProtocolString(d.protocol));
      Serial.print("  address=0x");
      Serial.print(d.address, HEX);
      Serial.print("  command=0x");
      Serial.println(d.command, HEX);
    }
    IrReceiver.resume();                    // Ready for the next frame
  }
}
5. Program 2: Sender (upload to board B)
In the sketch for board B, type the code below and upload to the UNO with TK16.
// Program 2: IR sender (upload to board B with TK16 on D3)
#include <IRremote.hpp>

#define IR_TX_PIN 3   // TK16 SIGNAL on D3

void setup() {
  Serial.begin(9600);
  IrSender.begin(IR_TX_PIN);                // Start sending on D3
  Serial.println("IR sender ready");
}

void loop() {
  Serial.println("IR sent");
  Serial.flush();                           // Let printing finish first
  IrSender.sendNEC(0x04, 0x16, 0);          // Address 0x04, command 0x16, no repeats
  delay(2000);                              // Every 2 s so the receiver can see
}
Program notes
Receiver (Program 1): IrReceiver.decode() is true when a whole frame has arrived. The library hands you an address and a command in decodedIRData; print them in hex, then call IrReceiver.resume() or nothing more is received. A held button sends short repeat frames with no data, which the sketch prints as [repeat].
Sender (Program 2): IrSender.sendNEC(0x04, 0x16, 0) sends one NEC frame with address 0x04 and command 0x16. The TK16 has no chip: the Uno makes the 38 kHz carrier itself, toggling D3, so Serial.flush() lets any printing finish before the frame starts.
NEC format: Most cheap remotes, including the one in the IR kit, send NEC: an 8-bit address and an 8-bit command. The numbers belong to the remote, not to the protocol, so read your own remote's codes with Program 1 rather than looking them up.
| Code | In this lesson |
|---|---|
#include <IRremote.hpp> | The IRremote library, version 4 or later |
IrReceiver.begin(pin, DISABLE_LED_FEEDBACK) | Start receiving on the pin SIGNAL is on (D3 here) |
IrReceiver.decode() | True when a whole frame has arrived; fills decodedIRData |
decodedIRData.address, .command | Which remote, and which button |
IRDATA_FLAGS_IS_REPEAT | Set on the repeat frames a held button sends |
IrReceiver.resume() | Must be called after each frame to receive the next |
IrSender.begin(pin) | Start sending on the pin SIGNAL is on (D3 here) |
IrSender.sendNEC(address, command, repeats) | Send one NEC frame |
6. Hands-on
- Board A: Upload Program 1, open Serial Monitor (9600), select board A’s port.
- Board B: Upload Program 2; you can open another Serial Monitor for board B or just watch board A.
- Point TK16 at TK15 from about 20 cm or more; board B sends every 2 s, and board A’s serial prints
NEC address=0x4 command=0x16. Closer than that, the receiver can be overwhelmed and fail to decode. - Point a normal IR remote at TK15; board A’s serial will show the received codes.
Expected result: As in the figure.
Note: TK64 and TK63 are infrared too, but they are a break-beam pair: TK64 has no 38 kHz demodulator, so it reports how much infrared light it sees, not a remote's codes. The full story of this pair is in the IR handbook.
Proceed to Lesson 27.
Edit this page — content/guides/tinkerblock-workshop/26-ir-communication.mdx
Questions about this product
See what other owners have asked, and read their solutions.
This page covers several products. Choose yours to see the right discussions.
Discuss this article
Ask about this page. The answer stays here, on the page it belongs to, for whoever hits the same wall next.