Twelve bars, six colours
Two each of red, yellow, green, blue, white and one multicolour bar. Colour is not decoration here: red and yellow need about two volts to light and the other four need about three, and that decides how bright they are and what rail they will run on.
What is in the box
Twelve bars, two of each of six colours, and twelve resistor boards to go with them. Strips of male pin header, because the resistor boards arrive with no pins in them. Twelve printed frames, and a case.
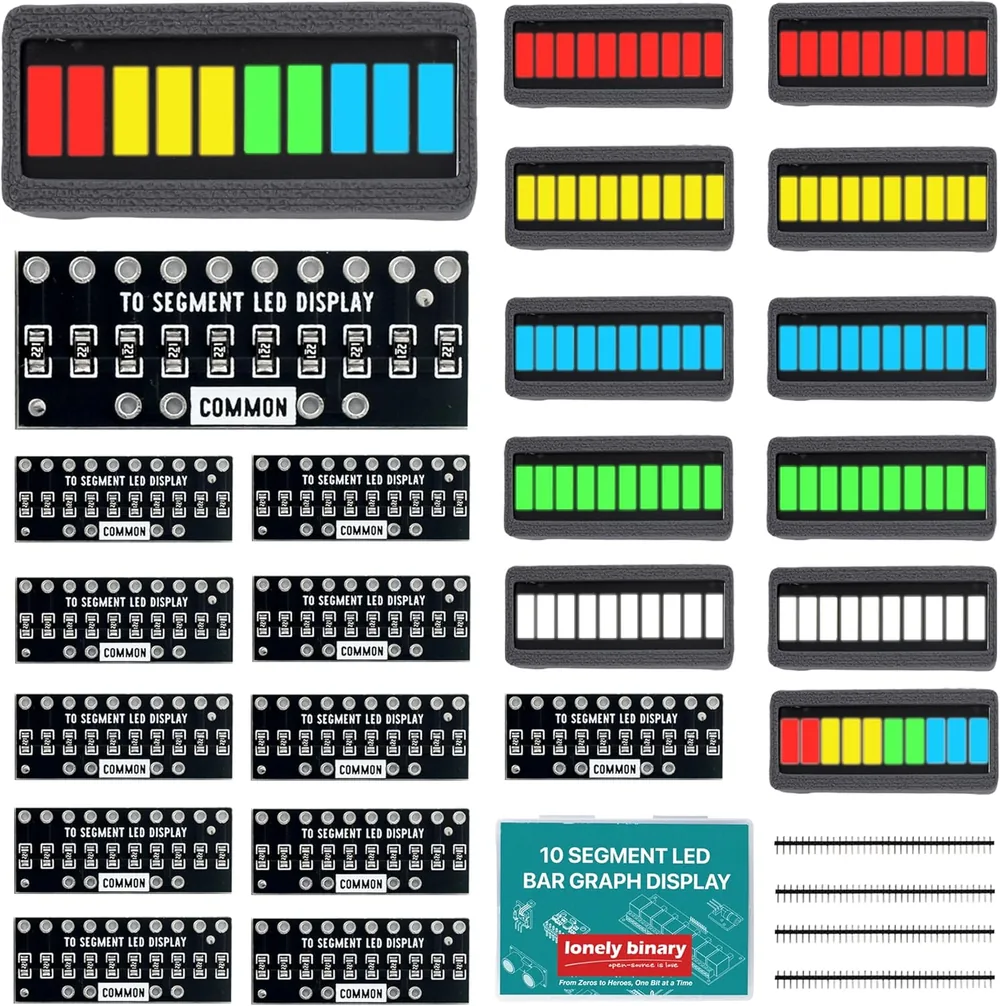
Two kinds of LED, wearing six colours
An LED takes a fixed voltage for itself — its forward voltage — before the resistor in series with it gets any say. That voltage depends on what the LED is made of, not on how bright you want it.
The red and yellow segments in this kit are the older phosphide LEDs and drop about 2 V. The green, blue and white ones are nitride LEDs and drop about 3 V. That one volt is the difference between everything on this page.
Those are the usual figures for the two chemistries rather than measurements of your particular bar, but the gap between them is real, and on the multicolour bar you can see it without a meter.
Why it matters later
Three things follow from the volt, and each one gets its own page:
- Brightness. Same resistor, same rail, a third less current in the nitride colours. Nothing in the code can fix that.
- Total current. A red bar with all ten segments lit draws half as much again as a blue one, and that is the number that runs into the Uno's limit in ten segments, one chip.
- What rail it will run on. A 3 V LED on a 3.3 V rail has almost nothing left over. 3.3 V or 5 V is that problem in full.
Twelve of them
Two of each colour is not generosity, it is spares. A bar has ten LEDs in it and a dead segment is a dead bar; a resistor board has ten joints to solder and a bad one is a segment that flickers. Build with one, keep the other.
When it does not work
It is, and the code has nothing to do with it. Behind the same 220 Ω on the same 5 V rail, a red segment gets about 14 mA and a blue one about 9 mA, because the blue LED takes a volt more for itself before the resistor sees anything. If you need them to match, put a smaller resistor on the blue one — but check the current article first.
Same reason, in one package. The multicolour bar has both kinds of LED in it: two red and three yellow segments at one end, two green and three blue at the other. All ten sit behind identical resistors, so the two halves run at different currents.
A part number in the 2510 family — the 25 and the 10 are the package's millimetres. The suffix is meant to say which colour it is, but the product renders for this kit reuse one number across several colours, so do not trust it. Go by the colour you can see.
Red and yellow if the project runs off anything under 5 V, or if you want every segment lit at once without thinking about it. Green, blue and white if it is on a proper 5 V rail and you want it to look modern. The multicolour bar if the scale has meaning at both ends — a level that is fine at one end and a problem at the other.
Ten resistors, one rail, and the pins it does not come with.
The resistor board →Edit this page — content/books/led-bar-graph/twelve-bars-six-colours.mdx
Questions about this product
See what other owners have asked, and read their solutions.
10-Segment LED Bar Graph Kit, 12 Bars in 6 Colours
Loading discussions…
Discuss this article
Ask about this page. The answer stays here, on the page it belongs to, for whoever hits the same wall next.