Which way round it goes
Both ends of the adapter print + then −, reading left to right. That means it fits a breadboard one way round, and on some breadboards it cannot be right on both sides at once. Ten seconds with the printing, before the cable goes in.
Two ends, the same way round
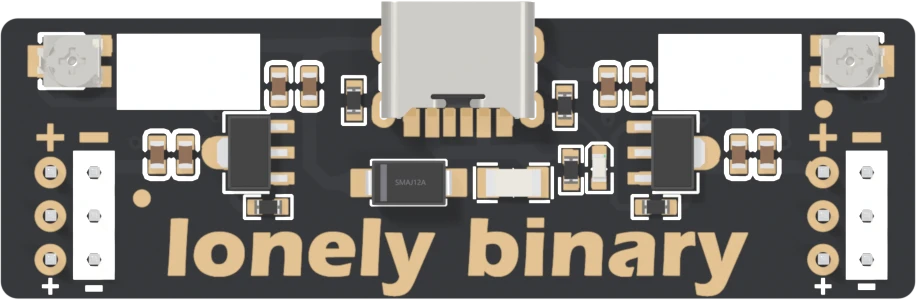
Hold the board with the USB-C socket on the far edge. Each end has a block of six pins: three for + and three for −, and the board prints + − over them, left to right, at both ends.
So at the left end the + pins are on the outside, and at the right end they are on the inside. The two ends are not mirror images of each other, and that is what the warning on the back is about: the board fits a breadboard in one direction only.
The breadboard is printed too
A breadboard marks its rails with a red + line and a blue − line, and it is the printing, not the metal, that you wire by. The strips themselves are all the same. So what matters is whether the breadboard's printing agrees with the adapter's at both ends.
Read across the breadboard, from one edge to the other, and there are three ways the rails are commonly printed:
| Printing across the board | Adapter as it comes | Adapter turned round |
|---|---|---|
| + − … + − | Both sides right | Both sides backwards |
| − + … − + | Both sides backwards | Both sides right |
| + − … − + | One side backwards | The other side backwards |
The first two are fine: one way round is right, and you find it once. The third is the one to know about. Turning the adapter end for end swaps the poles at both ends at the same time, so on a breadboard printed mirror-image there is no way round that gets both sides right.
Check before the cable goes in
- Seat the adapter across one end of the breadboard, pins in both pairs of rails.
- At each end, look at the + printed on the adapter and follow it straight down into the breadboard. It should land on the red + line.
- If both ends are wrong, turn the adapter round. If one end is wrong whichever way you turn it, the breadboard is printed mirror-image: use the other side, or re-mark it.
- Plug in the cable. With a meter on the rails, + should read positive against − at both ends.
What it costs to get it wrong
Nothing on the adapter shorts. Each pin is still in a strip of its own; the rail the breadboard calls + is simply ground, and the one it calls − is live. The damage is to whatever you wire by the printing: a sensor, a display or a chip with its supply reversed. Some parts survive that and many do not, and none of them say so until they stop working.
When it does not work
The adapter, almost certainly not: each pin is still in its own rail, so nothing is shorted, and the + and − rails have simply swapped names. What can be damaged is anything wired to those rails while they were reversed. Parts with no protection — most sensors, many chips — can fail when their supply is reversed. Unplug, turn the adapter round, and check each part before trusting it.
The pin blocks are a fixed distance apart, and breadboards are not all the same width. On a standard 830-point or 400-point breadboard both blocks land in the rails. On a narrower or unusual one they may not: do not force the pins in, because a bent pin can end up in the wrong strip.
Then the rails are just metal strips and the adapter decides which is which. Plug it in, measure which strip of each pair is + with a meter, and mark it with a pen. Every part you wire after that follows your marks.
Your breadboard's rails are printed mirror-image, + on the outside edge of both sides. No way round the adapter matches both. Use the side that matches, or use both and remember that one side's printing is wrong — a strip of tape over the wrong marks helps.
Two parts between the socket and your rail, and the two accidents they protect you from.
The fuse and the diode →Edit this page — content/books/bbpwd/which-way-round.mdx
Questions about this product
See what other owners have asked, and read their solutions.
This page covers several products. Choose yours to see the right discussions.
Discuss this article
Ask about this page. The answer stays here, on the page it belongs to, for whoever hits the same wall next.