Specifications
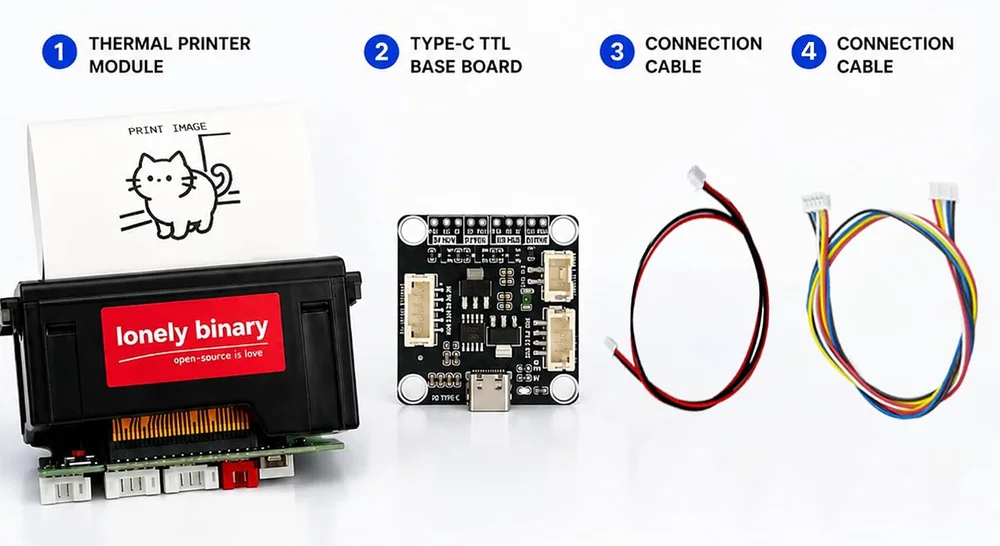
| In the receipt kit | 58mm thermal receipt printer module, Type-C TTL base board, a 9 V power cable and a TTL data cable |
|---|---|
| In the label kit | 58mm thermal label printer module, Type-C TTL base board, a 9 V power cable and a TTL data cable |
| Supply | 9 V, from a USB-C PD charger that supports 9 V. A computer's USB port supplies 5 V and will not run either printer |
| Resolution | 203 dpi, which is 8 dots per millimetre, across a line of 384 dots |
| Print width | 48 mm of printable width on 58 mm paper |
| Print speed | 50–80 mm/s |
| Receipt printer | 9600 baud, N-8-1, ESC/POS receipt commands, continuous roll. TTL and RS232 |
| Label printer | 115200 baud, N-8-1, label-mode 1A commands, die-cut labels with a gap sensor. TTL, RS232 and USB |
| Base board outputs | 9 V to the printer, and either 5 V or 3.3 V with serial to your microcontroller, on two separate five-pin headers |
| Base board headers | PRINTER DATA TTL is NC, TX, RX, DTR, GND. The MCU rows are DTR, RX, TX, supply, GND |
What these are
Two thermal printer kits that put text, barcodes, QR codes and small images on paper from a microcontroller. Both are driven over ordinary serial — three wires and a ground — and both come with the board that turns one USB-C cable into everything they need.
A thermal printer has no ink. It heats a row of elements against paper that darkens where it is touched, which is why the mechanism is simple, the paper is cheap, and the supply matters more than anything else on this page.
The thing that catches people
Not the code. The supply.
The socket on the base board is USB-C, and the obvious thing to do with a USB-C socket is plug it into a computer. Every USB-C port on earth starts at 5 V and only goes higher if the device asks — and the print head is a 9 V part. So a laptop, a desktop or a phone port leaves the printer sitting there, awake, accepting bytes, producing blank paper.
The base board's own sticker says it in three lines: must use a PD USB-C power adapter that supports 9 V output; do not use a laptop's USB-C port.
The 9 V a USB port does not have is the long version.
The base board
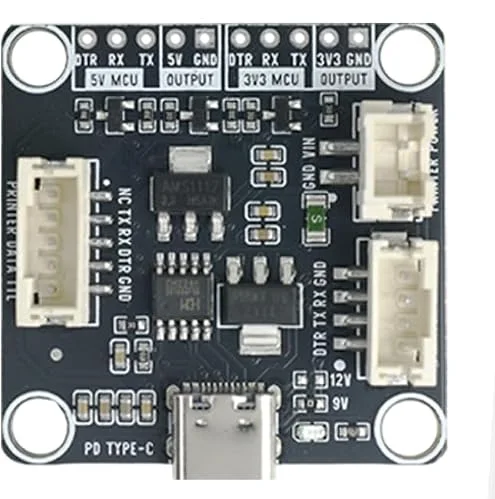
It is the same board in both kits — its sticker reads "Receipt/Label Printer base Board" — and it does two jobs. It negotiates 9 V from a PD charger and passes it to the printer, and it makes a 5 V or 3.3 V rail with a serial connection for your microcontroller.
The two microcontroller headers are the hazard worth naming twice. They carry the same five signals in the same order, they are next to each other, and they differ only in voltage.
Which printer is which
| Receipt kit | Label kit | |
|---|---|---|
| Paper | continuous roll | die-cut labels with a gap |
| Baud | 9600 | 115200 |
| Commands | ESC/POS (1B, 1D) | label mode (1A) |
| Interfaces | TTL, RS232 | TTL, RS232, USB |
| Module size | 82 × 46 × 45 mm | 85 × 85 × 56 mm |
| Library needed | none | LonelyBinaryLabelPrinter |
Both print 48 mm wide at 203 dpi on 58 mm paper, and both take 9 V from the same base board.
Wiring, in four lines
- USB-C PD charger (9 V capable) into the base board's
PD TYPE-Csocket — last, after everything else is connected. - Base board
PRINTER POWERto the printer's power socket. - Base board
PRINTER DATA TTLto the printer's TTL socket. - Base board
3V3 MCUor5V MCUto your board — itsTXto your RX, itsRXto your TX, supply and ground.
Where to start
The 9 V a USB port does not have, which is the failure that costs the first evening. After that the handbook goes through the base board, the two printers, the baud rate, and a first printed line on each machine.
The sketches and the label printer's library live in the kit's GitHub repository, Lonely-Binary/Receipt-Label-Printer.
When it doesn’t work
- I plugged it into my laptop and nothing happened.
- That is expected. The print head needs 9 V, and every USB-C port starts at 5 V and only goes higher if something negotiates for more — which a computer port cannot do. The base board is a PD trigger that asks for 9 V, so it needs a charger able to say yes. Most phone and laptop USB-C chargers list 9 V on the label. A computer port, a USB-A charger or a 5 V-only brick will not work, whatever the cable.
- Which header does my board go on?
- 3V3 MCU for an ESP32, an ESP32-S3 or a Raspberry Pi Pico; 5V MCU for an Arduino Uno, Nano or Mega. The two rows carry the same five signals in the same order at two different voltages and sit next to each other, so a header pushed onto the wrong one fits perfectly and puts 5 V on pins built for 3.3 V.
- What baud rate should I use?
- 9600 for the receipt printer and 115200 for the label printer. Both numbers are on a sticker on the back of the unit. If a printer has been reconfigured at some point, hold its button down with paper loaded: it prints a self-test page that states its own rate, and that page beats every other source.
- Can I use the same sketch for both printers?
- No. Besides the baud rate, the two speak different command families: the receipt printer takes ESC/POS, whose commands begin 1B or 1D, and the label printer takes label mode, whose commands begin 1A. The label printer also needs the LonelyBinaryLabelPrinter library, which is not in the Arduino library manager and installs from the ZIP in the kit's GitHub repository.
- The paper feeds but comes out blank.
- The roll is in upside down. Thermal paper is coated on one side only and the head is underneath, so a roll loaded backwards prints onto the side nobody can see. Pull a few centimetres out and scratch it with a fingernail — the side that marks is the side that must face the head.
- How wide can a barcode or a logo be?
- 384 dots, which is 48 mm. Anything wider is printed as far as the edge and then stops, with no error — a barcode missing its right-hand end scans as nothing at all. A CODE128 barcode is roughly (characters + 3) × 11 modules wide, times the unit width you set.
- Can the printer tell me when it runs out of paper?
- Yes, if you wire the printer's TXD back to your board's RX. Sending 10 04 01 gets a three-byte reply: 1A FE 23 means paper is loaded and 1A EF 23 means it is not. Both start with 1A, so a check that reads only the first byte gets the answer backwards — including the noPaper() helper in the label kit's own library.
- The board is marked 9V and 12V. Which should it be?
- 9 V. Both printers in these kits are 9 V units and both say so on their own stickers. The 12 V marking is there because the same base board is also used with printer modules that want 12 V.