Specifications
| Type | WS2812B addressable RGB LEDs |
|---|---|
| Data | One-wire, timing-critical |
| Colour | 24-bit per LED |
| Supply voltage | 5 V for full brightness |
| Current | Up to 60 mA per LED at full white |
What it is
Each LED contains its own driver. You send a stream of 24-bit colours down one wire; the first LED keeps the first three bytes and passes the rest along.
The protocol encodes bits as pulse widths a few hundred nanoseconds apart, which
is far too tight for digitalWrite. Every implementation uses either
bit-banging with interrupts disabled, DMA, or the ESP32's RMT peripheral —
FastLED and Adafruit NeoPixel pick one for you. On an ESP32 that also means the
RMT path, which is why the two libraries behave differently there.
The other constraint is current. A single LED at full white draws about 60 mA, so eight of them is nearly half an amp — more than a USB port will give you happily and far more than a 3.3 V regulator can. Run them from 5 V directly and keep the brightness down while you are developing.
Pinout
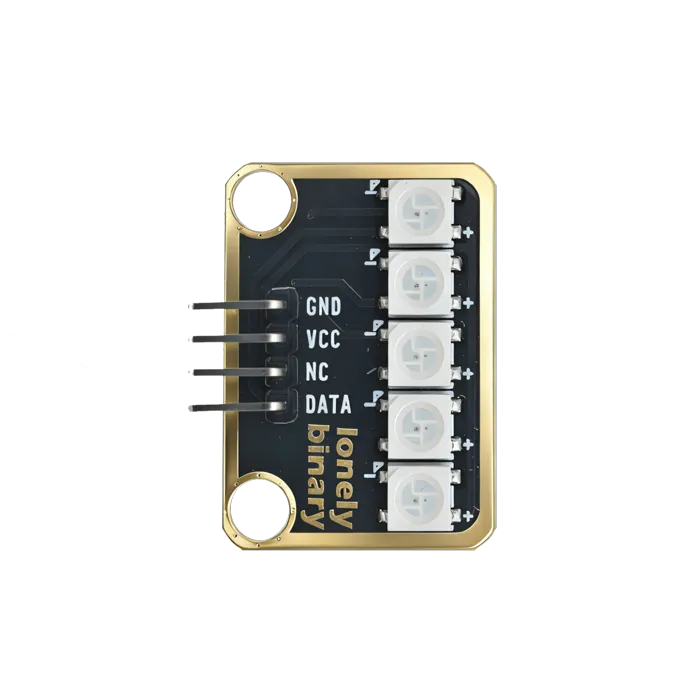
- GND (negative): Like the negative terminal (-) of a battery, connect to the control board's GND
- VCC (positive): Like the positive terminal (+) of a battery, connect to the control board's 5V (Note: Must connect to 5V, cannot use 3.3V)
- DATA (data line): Transmits control signals, connect to the control board's digital pin (e.g. Arduino D6 or Pico GPIO 0)
- NC (no connection): No actual circuit connection, included for unified interface, can be left unconnected
Wiring
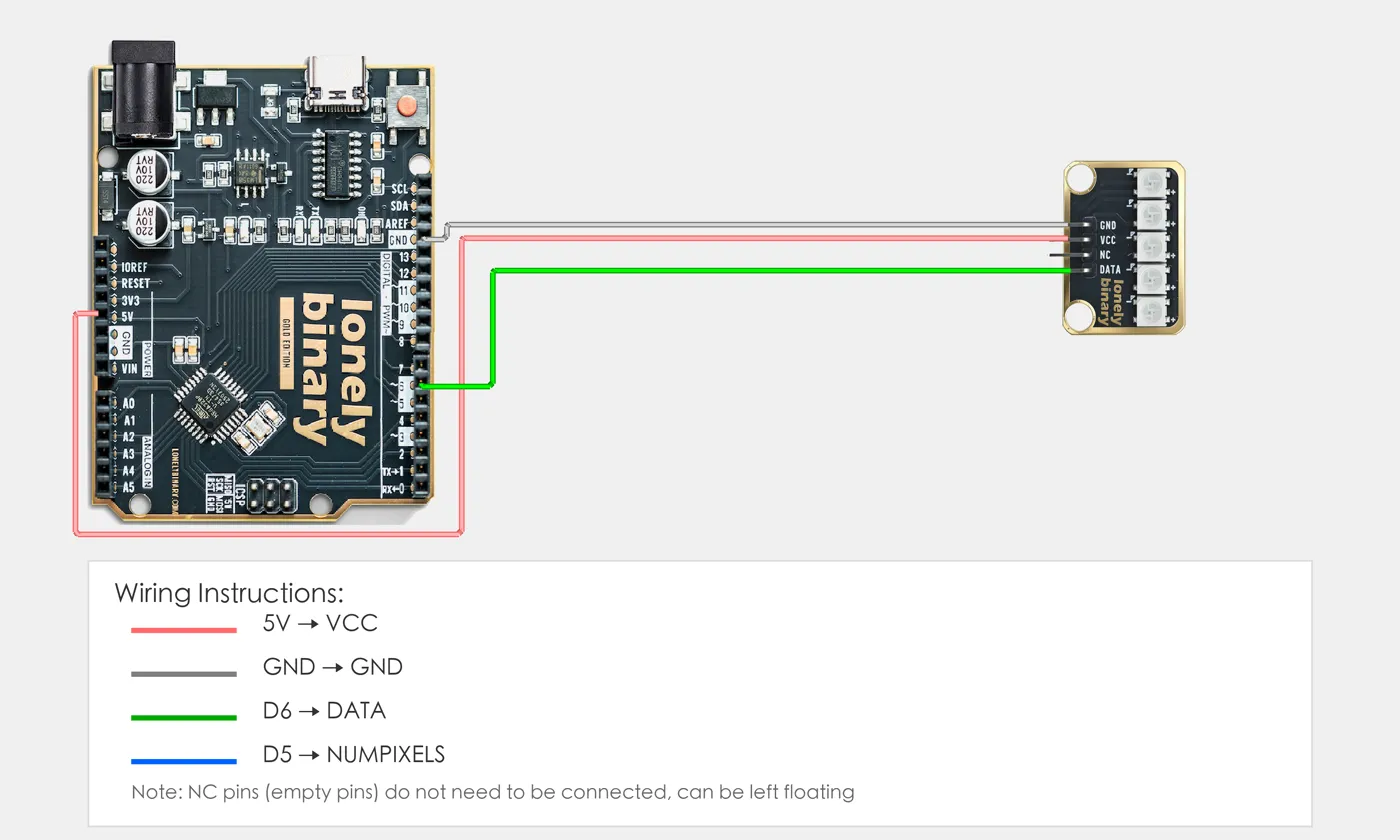
- GND → Control board GND
- VCC → Control board 5V
- DATA → Control board digital pin (use the pin defined in your program)
Example
// Include FastLED library for controlling WS2812 LEDs
#include <FastLED.h>

// Pin number and LED count: change these to match your wiring
#define PIN 6        // Arduino digital pin connected to DATA (e.g. D6)
#define NUMPIXELS 5  // Number of LEDs (this module has 5 LEDs)

// Create color array to store color values for each LED
CRGB leds[NUMPIXELS];

void setup() {
  // Initialize WS2812 LEDs
  FastLED.addLeds<WS2812, PIN, GRB>(leds, NUMPIXELS);
  // WS2812: LED type
  // PIN: Data pin (pin 6)
  // GRB: Color order is Green-Red-Blue (WS2812 standard)
  // leds: Color array
  // NUMPIXELS: Number of LEDs (5)

  // Set brightness to 50 (range 0-255, 0=off, 255=brightest)
  // 50 is about 20% brightness, visible effect without being too bright
  FastLED.setBrightness(50);
}

void loop() {
  // Rainbow gradient effect: make each LED display different colors, forming a flowing rainbow
  for(int i=0; i<NUMPIXELS; i++) {
    // Calculate hue value (color type) for each LED
    // i * 256 / NUMPIXELS: Give each LED a different starting color, forming rainbow distribution
    // millis() / 20: Increment over time, making rainbow flow (larger number = slower flow)
    // % 256: Ensure hue value cycles within 0-255 range
    int hue = ((i * 256 / NUMPIXELS) + (millis() / 20)) % 256;

    // Set LED color (HSV to RGB)
    // CHSV: FastLED library HSV color function
    // hue: Hue value (0-255), controls color (0=red, 85=green, 170=blue, 255=red)
    // 255: Maximum saturation (most vivid color)
    // 255: Maximum brightness (already controlled to 50 by setBrightness())
    leds[i] = CHSV(hue, 255, 255);
  }

  // Send all colors to LEDs at once (update together to avoid flickering)
  FastLED.show();

  // Delay 10 milliseconds to control animation speed (smaller number = faster flow)
  delay(10);
}When it doesn’t work
- The first LED works and the rest are wrong.
- A 3.3 V board driving a 5 V strip is marginal on the data line. Add a level shifter (TK97), or power the strip from 3.3 V and accept dimmer output.
- Colours flicker or the strip resets randomly.
- Current. Measure what you are actually drawing, add a 1000 µF capacitor across the strip's supply, and drop the global brightness.
- Red and green are swapped.
- Colour order varies by part — GRB is the common one. Tell the library: `NEO_GRB` or FastLED's `<WS2812B, PIN, GRB>`.